Activate HTTPS on Blogger third party Domain 100% Worked
How To Get HTTPS In Custom Domain In Blogger? - SE Optimized

Yes, it's been quite a while since I distributed my last post, yet here, I have something interesting for you!
The thing I am today going to share worth your important minutes. Too, oh my goodness that I have a few bits of new substance to compose in the up and coming days. In this way, on the off chance that you haven't yet.
So yes, how about we go to the thing that I will disclose to you today, the most anticipated thing for which bloggers have held up a considerable measure.
Along these lines, clients of BlogSpot have their blessing. That is to say, clients of BlogSpot space who haven't purchased any custom area. The blessing is: SSL Declaration for their area. Be that as it may, shouldn't something be said about blogger websites with the custom area? Will they need to hold up additional? No remark. All things considered, see the address bar and you'll see that Blogger Guider has SSL Authentication, and it is fueled by CloudFlare and along these lines, our blog's stacking speed has additionally diminished!
")

Along these lines, 1.46s for a 4.6 MB is not terrible. Contrast this and different online journals or sites with comparative page size and you'll see that they stack slower. That is the impact of, yes, right-CloudFlare. CloudFlare is a CDN benefit which is Allowed to utilize, and will utilize this administration just, with some JavaScripts to move your blogger blog from HTTP to HTTPS and in reward, you'll get a lift in your blog's stacking time.
Presently, I'd get a kick out of the chance to make this unmistakable in beginning, that, I don't prescribe utilizing the thing I will share. No, don't take it that contrarily. I intend to state, I've utilized CloudFlare's free arrange in this post yet, I exceptionally prescribe you utilizing their Ace Arrangement which costs just $20 every month. All things considered, when you have a decent blog + great wage, then interest in right things is likewise imperative.
Along these lines, without squandering your time, how about we begin!
Why Moving To HTTPS Is Necessary Or Recommended?
Everybody know Google gives a slight lift to the rank of locales which are HTTPS empowered. In any case, slight increment. That is insignificant on the off chance that you inquire me. In any case, the contort most likely is, in future, as indicated by what I have perused up until now, Google will build the impact of this "lift" and that time, you'll be desirous of WordPress locales.
So, you’ve got the reason to follow this guide but, let’s
first read some important points:
Moving From HTTP To HTTPS
So, let’s start the process. Firstly, we’ll change the
default nameservers. In my case, my domain registrar was GoDaddy and
so, in this post, I’ve shown the settings of GoDaddy only. If
your domain registrar is not same, then see this section of the post.
redirected to HTTP all the time whether is it a subdomain or the main
domain and keeping the directory (characters after the domain). Now,
what’s next? You should not forget that the links in your blog do
not have “HTTPS” in their starting and to let Google know
that you’ve moved to HTTPS and get your new URL indexed faster,
you should change all your blog links from HTTP to HTTPS. But, how?
It’s a hectic task! But we’ve made it simple.
Console and Robot.txt.
Hm…so this was a long and techy process. Why you’re willing
to do all this when a professional can do this for you? I’ve
collected people who will do this work for you at a very reasonable
cost. Plus, if you want any kind of information about SSL or about any
other things, you’re welcome to our try our service. You can
contact me here and get your work done within some minutes.
Cons Of This Early Adaption
There are some disadvantages (plus, the solution of them) of using this
method to move your blog from HTTP to https. These are giving below
followed by their solutions:
Final Words
I trust you've preferred this guide and gladly, I can state that we're the first on the web to uncover this trap which works like for hell's sake. On the off chance that you have any issue, make certain to get in touch with us. Share this blog entry to tell more individuals about this phenomenal guide, much appreciated!
The thing I am today going to share worth your important minutes. Too, oh my goodness that I have a few bits of new substance to compose in the up and coming days. In this way, on the off chance that you haven't yet.
So yes, how about we go to the thing that I will disclose to you today, the most anticipated thing for which bloggers have held up a considerable measure.
Along these lines, clients of BlogSpot have their blessing. That is to say, clients of BlogSpot space who haven't purchased any custom area. The blessing is: SSL Declaration for their area. Be that as it may, shouldn't something be said about blogger websites with the custom area? Will they need to hold up additional? No remark. All things considered, see the address bar and you'll see that Blogger Guider has SSL Authentication, and it is fueled by CloudFlare and along these lines, our blog's stacking speed has additionally diminished!
Along these lines, 1.46s for a 4.6 MB is not terrible. Contrast this and different online journals or sites with comparative page size and you'll see that they stack slower. That is the impact of, yes, right-CloudFlare. CloudFlare is a CDN benefit which is Allowed to utilize, and will utilize this administration just, with some JavaScripts to move your blogger blog from HTTP to HTTPS and in reward, you'll get a lift in your blog's stacking time.
Presently, I'd get a kick out of the chance to make this unmistakable in beginning, that, I don't prescribe utilizing the thing I will share. No, don't take it that contrarily. I intend to state, I've utilized CloudFlare's free arrange in this post yet, I exceptionally prescribe you utilizing their Ace Arrangement which costs just $20 every month. All things considered, when you have a decent blog + great wage, then interest in right things is likewise imperative.
Along these lines, without squandering your time, how about we begin!
Why Moving To HTTPS Is Necessary Or Recommended?
Everybody know Google gives a slight lift to the rank of locales which are HTTPS empowered. In any case, slight increment. That is insignificant on the off chance that you inquire me. In any case, the contort most likely is, in future, as indicated by what I have perused up until now, Google will build the impact of this "lift" and that time, you'll be desirous of WordPress locales.So, you’ve got the reason to follow this guide but, let’s
first read some important points:
Your traffic will be down for few days until Google correctly
indexes all your URLs with HTTPS.
During this all process, if you made any mistake, then your
blog can go down for few hours (so, consider doing this all
after 12 AM if you get most of your traffic from India)
You’ll have to remove all the widgets that are
hosted/attached to non-SSL hosts.
Moving From HTTP To HTTPS
So, let’s start the process. Firstly, we’ll change thedefault nameservers. In my case, my domain registrar was GoDaddy and
so, in this post, I’ve shown the settings of GoDaddy only. If
your domain registrar is not same, then see this section of the post.
- Firstly, sign into your domain registrar (in our case, it’s GoDaddy)
- Open DNS Manager, now open a new tab
- Open CloudFlare sign up page and sign up there and then, you’ll get this page:
- Now, type your domain in the box given and click “Scan
DNS Records.”
- After about 60 seconds, CloudFlare will complete scanning your
domain’s DNS records, and now you’re ready to do
some manual action. -
Go to your Domain Registrar’s DNS manager and then, you
have to copy all the DNS records from Registrar’s DNS
manager to CloudFlare DNS manager. -
It’s easy. You just have to copy all of them, except the
ones that are already on CloudFlare. Just do it one-by-one and
this will get done within some jiffies. -
Now, for this tutorial, we’re going to use their
“FREE” Plan which is limited to limited SSL
(elaboration- your site will not open up in older Androids and
mobiles). -
In the next page, you’ll be asked to choose plans. Choose
FREE just for now (we highly recommend Pro Plan) -
Now, you’ll be given two nameservers, and it’s the
time to place those nameservers on your domain registrars to
enable CloudFlare to get control over the blog. -
Now, go back to your registrar and find settings to change
nameservers. In GoDaddy, it is- Settings > Nameservers > Manage
- Change Nameservers to ones that CloudFlair has given you and
save. Within some time, your CloudFlare account will be ready
and faster.


- Firstly, go to “Crypto” tab and select
“Flexible” from “SSL” card’s
dropdown as shown in the picture below:
Congratz! You’ve successfully enabled SSL on your Blogger
blog. Try visiting your blog with “https” followed
by your domain.
Now, we have to redirect HTTP version of our domain and all
subdomains from HTTP to https and to do this, “Page
Rules” will help us.
Head over the “Page Rules” tab and add three Page
Rules as shown in the images below:
Be sure that these Page Rules are in the same order.
Now next step: head over “Firewall” app and from
the “Security Level” card, set it to
“Low” and log out from CloudFlair because now
there’s nothing to do with it.


redirected to HTTP all the time whether is it a subdomain or the main
domain and keeping the directory (characters after the domain). Now,
what’s next? You should not forget that the links in your blog do
not have “HTTPS” in their starting and to let Google know
that you’ve moved to HTTPS and get your new URL indexed faster,
you should change all your blog links from HTTP to HTTPS. But, how?
It’s a hectic task! But we’ve made it simple.
Open your blog’s template HTML
Search for `</head>` and paste following code above it:
<script>
$(document).ready(function() {
$("a").each(function() {
var i = $(this).attr("href");
var n = i.replace( http://www.yourdomain , " https://www.yourdomain"); $(this).attr("href", function() {
return n
})
})
});
</script>
Now here comes the coding part. Search for the following code
in your template:
<b:include data='blog' name='all-head-content'/>
Remove it and below “<head>” paste the
following codes:
<link href='https://www.yourdomain .com/favicon.ico' rel='icon' type='image/x-icon'/>
<meta content='blogger' name='generator'/>
<link href='https://www.yourdomain .com/feeds/posts/default' rel='alternate' title='Blogger Guider - Atom' type='application/atom+xml'/>
<link href='https://www.yourdomain .com/feeds/posts/default?alt=rss' rel='alternate' title='Blogger Guider - RSS' type='application/rss+xml'/>
<link href='https://www.blogger.com/feeds/ BLOGID/posts/default' rel='service.post' title='Blogger Guider - Atom' type='application/atom+xml'/>
<!--[if IE]><script type="text/javascript" src="https://www.blogger.com/static/v1/jsbin/2591933621-ieretrofit.js"></script>
<![endif]-->
<meta expr:content='data:blog.url' name='og:url:domain'/>
<!--[if IE]> <script> (function() { var html5 = ("abbr,article,aside,audio,canvas,datalist,details," + "figure,footer,header,hgroup,mark,menu,meter,nav,output," + "progress,section,time,video").split(','); for (var i = 0; i < html5.length; i++) { document.createElement(html5[i]); } try { document.execCommand('BackgroundImageCache', false, true); } catch(e) {} })(); </script> <![endif]-->
Now, see for any unsecured (without HTTPS) link in your
template and replace them with secured ones if you have found
or alternatively, upload them to your own host.
Last thing and the most tedious task- if your images are not
SSL certified or are not hosted on SSL compatible or secured
host, then please upload them to any free hosting services like
postimg.org that are SSL enabled and replace those images with
SSL certified images. Once you are done- congrats, you’re
80% done!
Console and Robot.txt.
Go to Blogger > Settings > Search preferences >
Crawlers and indexing > Custom robot.txt
Edit it and use the following code instead of the one
you’re using currently to make it SSL Compatible:
Now save it and head over Google Search Console.
Add your domain in all the following four ways:
Now after adding the first three and while adding the fourth
one, submit your sitemap. Please note that you are not required
to submit sitemap from every domain I’ve listed above.
Just while adding the last one (https://www.yourdomain.com) submit the sitemap.XML file.
Now you’re ready, and your blog is fully SSL compatible.
:)
User-agent: Mediapartners-Google
Disallow:
User-agent: *
Disallow: /search
Allow: /
Sitemap: https://www.web-development.cf/sitemap.xml
http://yourdomain.com
https://yourdomain.com
http://www.yourdomain.com
https://www.yourdomain.com
Don’t want to do this all and make your hands dirty?
Hm…so this was a long and techy process. Why you’re willingto do all this when a professional can do this for you? I’ve
collected people who will do this work for you at a very reasonable
cost. Plus, if you want any kind of information about SSL or about any
other things, you’re welcome to our try our service. You can
contact me here and get your work done within some minutes.
Cons Of This Early Adaption
There are some disadvantages (plus, the solution of them) of using thismethod to move your blog from HTTP to https. These are giving below
followed by their solutions:
- After moving, you’ll not be able to forward any of your
subdomains to any URL –SOLUTION – Suppose you want to redirect fb.yourdomain.com
to facebook.com/yourdomain, then, navigate to CloudFlare DNS
manager and their, add a CNAME with “Name”
subdomain (for fb.yourdomain.com, it will be “FB”)
and with “Value” ghs.google.com. Then, link it to a
blogger blog and redirect that blogger blog to any
blog/website. For example, see contact.bloggerguider.com.
We’ve used this simple trick to redirect
contact.bloggerguider.com to support.bloggerguider.com.
SOLUTION 2 – Use “Page Rules” to forward but
they’re too limited in numbers.
- You’ll not be able to move back, and when you try to,
you’ll lose traffic. No solution, this will happen with
any domain.
Simple way -> Short way if you wrong in any steps. Following this my simple guides:
1. Login cloudflare -> https://cloudflare/a/login (register if you not have cloudflare accounts). -> HeRe Tutorial For Registering Blogger Thirdty Domain to Cloudflare <-
2. Go to https://cloudflare.com/a/crypto/YOURDOMAIN.TLD -> Choose SSL FLEXIBLE
3. Go to https://cloudflare.com/a/firewall/YOURDOMAIN.TLD -> Set Security level to LOW
4. Go to https://cloudflare.com/a/page-rules/YOURDOMAIN.COM -> add third rules below ->
4.1. RULES OPTION (Source --> Rules --> Target)
4.1.1. http://*yourdomain.com/* --> ALWAYS USE HTTPS --> https://*yourdomain.com/*
4.1.2. http://yourdomain.com/* --> 301 Permanent Redirect --> https://yourdomain.com/$1
4.1.3. https://yourdomain.com/* --> 301 Permanent Redirect --> https://yourdomain.com/$1
Fix Issues: 525 SSL HANDSHAKE FAILED on Cloudflare
1. Go to https://cloudflare.com/a/dns/YOURDOMAIN.COM -> See Failed/Wrong DNS Option here
 Change to valid cloudflare dns with the following tutorial below:
Double click icon below or open the settings dns one by one and doubleclick the icon : it will be change the icon to YELLOW CLOUD FORWARD. Like this:
 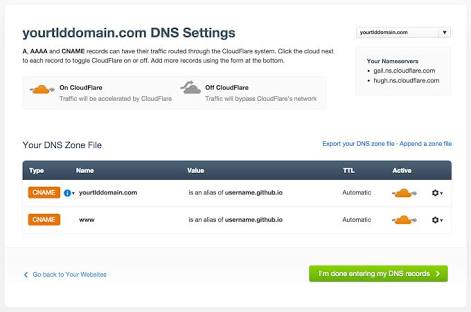 CHANGE all your dns or spesific dns LIKE ABOVE IMAGE (Yellow icon). Save.
Done.
Reload Your website.
Double click icon below or open the settings dns one by one and doubleclick the icon :
it will be change the icon to YELLOW CLOUD FORWARD. Like this: Done.
Reload Your website.


Comments
Post a Comment
Bila Ada posting yang kurang, atau error atau yang lainnya, silahkan tinggalkan komentar agar artikel/post di perbaiki.
Jangan Lupa Cek Box "Notify Me" agar tahu komentar kamu dibalas oleh saya.
If there are any posts that are missing, or error or anything else, please leave a comment for the article / post to be fixed.
Do not Forget Check Box "Notify Me" to know our comments replied by me.